Git & GitHub — The Complete Developer’s Guide (From History to Advanced Commands)
A practical, beginner-friendly and deeply complete guide to everything Git — from history to branching, merging, stashing, diffs, commits, resetting,

This is a guide, which enough to contribute to open source / for collaborating with other / to work on your own projects.
What is Git?
Git is a Version Control System (VCS) — think of it as a time machine for your code.
It allows you to:
Track every change you make.
Go back to any previous version.
Work with others without overwriting each other’s code.
Maintain a complete history of your project.
Git is the tool that sits between you and chaos. It keeps your work safe, organized, and collaborative.
History of git - Story time :
Story Time — How Git Was Born
Back in the 2000s, Linux Kernel — one of the biggest open-source projects in the world — had thousands of developers contributing from all over the globe.
They initially used a commercial tool called BitKeeper to manage version control. But in 2005, its free license for open-source development was revoked.
So Linus Torvalds (the creator of Linux) famously said:
“Fine. I will build my own VCS.”
He wanted a tool that was:
⚡ Fast (lightning fast).
🌍 Distributed (no central server).
🔐 Secure (every version cryptographically verified).
🔀 Easy to merge code.
And in April 2005, Git was born.
🧠 What Does Git Actually Do?
Think of Git like Track Changes in MS Word/Google Docs —
but for code… and for multiple people at the same time.
Git is a Version Control System (VCS) — think of it as a time machine for your code.
Git keeps track of:
What changes were made
Who made them
When they were made
And lets you go back in time anytime you want
It enables safe and powerful collaboration on any project.
Where Is Git Used?
Git is everywhere:
1. Software Development
Used by all major tech companies:
Google, Microsoft, Netflix, Meta, Amazon, etc.
2. Open-Source Projects
Linux, React, TensorFlow, Python, Kubernetes —
all managed using Git + GitHub.
3. Freelancing / Startups / College Projects
Perfect for project management, research, documentation, design, and prototyping.
Why Is Git So Powerful?
Imagine you and a friend are writing a book together.
Without Git:
You send files via Email/WhatsApp
You lose track of versions
If both edit the same paragraph → total mess
With Git:
Both of you have your own copies (repositories)
You work separately and commit changes
Git merges edits cleanly
Every version is saved forever
Git = Smart Collaboration + Time Travel + Backup
Git vs GitHub
Git
A local version control system installed on your computer.
The engine that handles commits, branches, merging, etc.
GitHub / Git Lab / Bit bucket
Cloud platforms that host your Git repositories and allow team collaboration.
Think of it this way:
Git = Engine
GitHub = Parking place + Marketplace of repositories / projects
We have seen git is distributed VCS. But what is distributed ?
Centralized vs Distributed Version Control
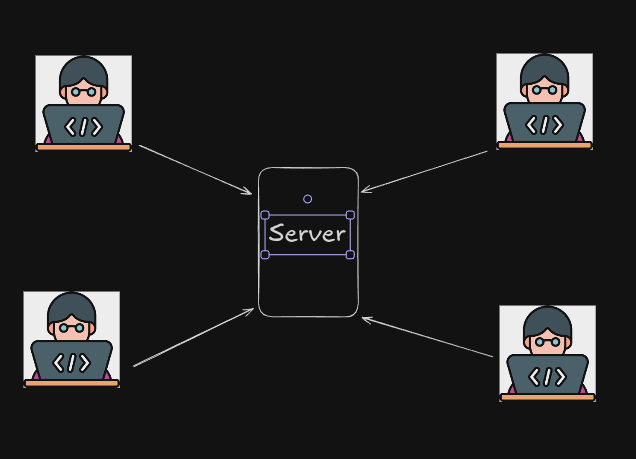
Centralized Version Control
Everything is stored on one central server.
If the main server is down → no work can be done.
Single point of failure ❌
Clients depend on the server for history + version retrieval
Distributed Version Control (Git)
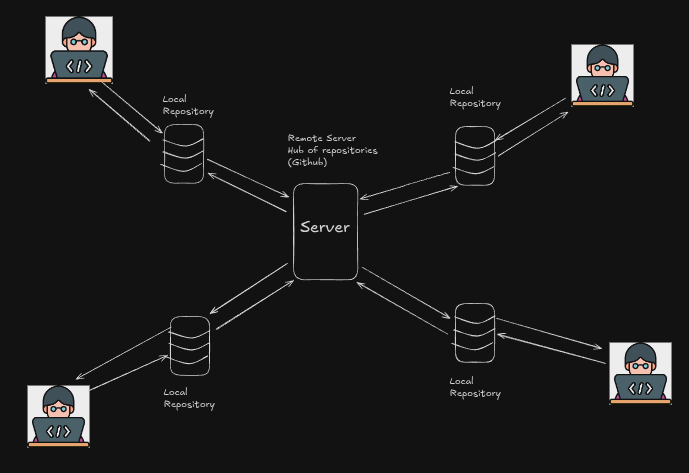
Every developer has a full copy of the repository.
Work continues even without the internet or server.
Everyone has a full copy of the project.
No dependency on a central server for work.
Collaboration is flexible and resilient.
Git, Mercurial follow this model.
How to access / use Git ?
Command line (Fast and Easy) (Most developers prefer this way).
Code Editors / IDE such as Git lens.
GUI such as Git Kracken, Source Tree.
Download the Git from git-scm, open Git Bash if you are on windows or You can directly use from terminal if you are on Mac OS or Any other Linux Distros.
Check whether the Git is installed properly or not by using:
git --version
You should see the version as output.
Settings:
First thing after installing the Git is to set and understand the Name, Email, Default Editor and Line Ending.
A system or a computer can have multiple users with different kinds of access in Unix bases OS es.
We can set these attributes on 3 levels:
System Level → For all users
Global Level → All repositories of the current user.
Local Level → The current repository.
What is repository ? We will look that further in this blog.
Let’s continue with Settings:
Command format goes something like below
git config --<level> user.<attribute> "attribute details"
Let’s see how we generally setup these things in daily life:
Name:
git config --global user.name "Muzammil Shaik"Email:
git config --global user.email "abcd@gmail.com"Code Editor:
By default the code editor is Vim (Some people are scared of it), If you want to change, Let’s set it to VS code:
git config --global core.editor "code --wait"when you execute the above command, It opens up a new window in vs code. After editing and making the changes, Just save it and close the window, because the terminal will be waiting for you to close the window. If it’s not closed, Terminal will keep waiting until its closed.
To access or edit the file:
git config --global -e
End of the lines:
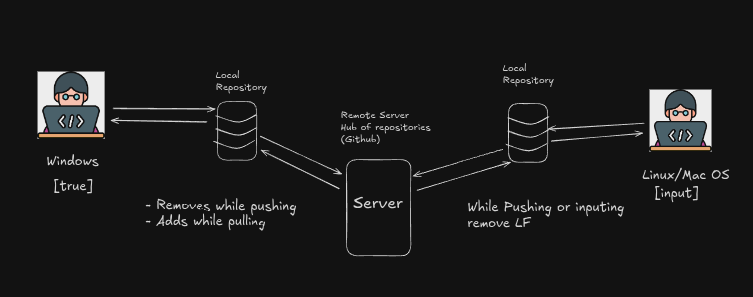
In Windows, It ends with two escape characters - CRLF (Carriage return line feed) :
\r → Carriage return.
\n → Next line or Line feed.
In Mac OS / Linux Distros - LF (Line feed) :
- \n → Next line or Line feed.
This can create problems where Git shows changes even when nothing actually changed.
When collaborating, People uses different OS in their machines, Let’s understand this with a picture.
Windows:
git config --global core.autocrlf trueWhat does this do ?
Prevents weird extra changes.
Keeps repository clean.
Makes your local files compatible with Windows.
Mac OS / Linux:
git config --global core.autocrlf inputWhat does this do for Mac OS / Linux ?
Ensures the repository stays with clean
LFendings.Your local editor (VS Code, Vim, etc.) remains unchanged.
Need any help with command:
 git commit --help # Pulls Docs in terminal.
 git commit -h # Pulls short summary of each command.
Creating a Directory and Getting Started with Git:
Before we dive into creating repositories. I want you guys to try some handy Linux commands, which will be very helpful further.
Create a new directory/folder through terminal:
mkdir Moon # mkdir - Make DirectoryChange Directory: (Going inside of the folder)
cd MoonTo print something on the terminal, We use:
echo "hello" # Outputs - helloTo insert over write something into a file:
echo "hello" > file.txtCreate a file if
file.txtdoes not exist in the current repository.If file already exists then, Overrides all its content with
hello.To just append things to file contents we can use “>>“ instead of “>“.
I think that’s more than enough to understand, If you wanna dive deep you can checkout my Linux commands blog. If there are any commands remained, we will discuss them as we move forward.
Staging:
We will create a new directory / folder called git-practice.
mkdir git-practice # Creates a New Directory
cd git-practice # Going inside of git-practice folder.
Now git-practice is a directory, It’s not a repository yet.
To create a new repository inside the git-practice, use the following command:
git init # Initializes git repository in the current folder
This command will create a .git folder inside the current folder. It will not be visible but you can see it by un-hiding the hidden folder or you can type:
ls -a # This will show all the hidden files.
This is the folder responsible for tracking every information you save in using git.
If this folder is gone, You cannot recover it, So be cautious.
/git-practice/.git - Is called as git repository of that particular folder.
/git-practice is the project folder.
Let’s create a two files. We have already discussed how to create new files using command line.
file1.txt and file2.txt.
Think of it like a marriage ceremony, Where people will be waiting in line to meet the bride or bride-groom to take a picture. That picture will go to marriage photo album.
Here,
People who are waiting in the line are un-staged (About to take a picture / Waiting to take a picture).
Queue is a staging area.
People who are on the stage are staged people. They can take picture any time.
Marriage photo is a snapshot of that day. It’s called commit in git. Your codes screenshot has been taken if committed.
Once committed you can
Review that any time.
Revert to that particular time and see how it looks at that time.
Basically do whatever you want. That is the whole idea right !!!
To see the status of the current files we use status commands:
git status # Shows what are all the tracked/staged files or untracked/unstaged files
If it says untracked files, They are not added into the staging area yet !!!
To track the changes / To get them on stage we need to use:
 git add . # . -> refers to all unstatged files in the current working directory recursively
 git add <filename> # Adds only that particular file in the staging area
 git add <file1> <file2> # We can add multiple files at once.
Just like whom you want to go on to the stage.
To take a picture or snap shot of code use:
 git commit -m "Two files added" # This will create a commit or Snapshot of the code.

 # You can use short-form
 git commit # open the default editor and add short description and close it.
You can view whether the snapshot has been taken or not by using the following command:
git log # Will show all the commits in the current git repository.
Disclaimer: When we actually work in an organization, We don’t directly commit like above. We will create a new branch for every single feature and then we will add all files and then we will commit them. Now you might have questions like what is branching ? Don’t worry we will discuss it further !
We will continue learning, after discussing some best practices of commits:
Best Practices Of Commits:
Our commit should not be too big or too small.
As you reach a stage where you want to record and then make a commit.
Each commit should represent the logical update / feature.
Bug fixes, Typos → Two different commits, Make it meaningful. It’s upto the maintainer how he wants to arrange these commits.
Wording in commit messages should be present tense. (
Fix bug in user authentication). It should NOT be likeFixed bug in user authentication.
Branching in Git
Branching is one of the most powerful features in Git.
It allows you to create separate timelines (or “paths of development”) inside the same project without affecting the main code.
This means you can:
Work on new features
Fix bugs
Experiment safely
Merge work back when ready
All without breaking the main project.
Why Branching?
Without branching:
You change code directly on
mainRisk of breaking production
Hard to work on multiple features simultaneously
With branching:
Each feature gets its own isolated workspace
Main branch stays clean
Collaboration becomes easier
Merging integrates your changes safely
Visual Explanation of Branching
Imagine your project timeline:
A --- B --- C (main)
You create a new branch:
A --- B --- C   (main)
           \
            D   (feature-login)
You now have two timelines:
mainbranch (stable)feature-loginbranch (your new work)
You can update the feature branch independently.
If you add more commits:
A --- B --- C               (main)
           \
            D --- E --- F   (feature-login)
When work is complete, you merge it back.
Creating and Working With Branches
Create a new branch
git branch feature-login # Create a branch
Switch to another branch
git checkout feature-login # Move HEAD to this branch
Modern version:
git switch feature-login # Switch branch (recommended)
Create + switch in one command
git switch -c feature-login # Create and switch immediately
List all branches
git branch # Shows all local branches
Current branch is marked with *.
Merging Branches
After finishing work on the feature branch, merge it into the main branch.
Step 1: Switch to main
git switch main # Move to main branch
Step 2: Merge the feature branch into main
git merge feature-login # Merge feature-login into main
Visual representation of merging:
Before merging:
main:    A --- B --- C
                  \
feature:           D --- E
After merging:
main:    A --- B --- C --------- M
                  \             /
feature:           D --- E ----
Depending on project structure and commit history, Git may:
Perform a fast-forward merge (if main has not moved)
Create a merge commit (if both branches have diverged)
Pulling and Pushing (Remote Integration)
Add remote URL (connect GitHub)
git remote add origin <repo-url> # Connect local repo to GitHub
- origin is the name of the url
Push code to GitHub
git push -u origin main # First push + set upstream tracking
Pull the latest changes
git pull origin main # Fetch + merge changes from GitHub
Skipping The Staging Area:
git commit -am "Fix the bug the users form sign up"
- a → This flag represents add all to staging area.
You know the rest.
Removing Files:
git ls-files # shows all the files in the statging area
To remove the files from staging area, just add it again with file name.
  git add file2.txt # removes the file2.txt file from staging area even though
                    # its not in project folder.
Now we have made a change, What should we do ? If you said “We should commit“ , Then you’re absolutely correct. Deletion is also a change right ?
You can directly remove from staging area using:
git rm file2.txtrm→ Means remove
Renaming or Moving Files:
In Git (and your terminal), you can rename or move files using the mv command.
mv file1.txt main.js
The mv command does two things:
Renames the file
Moves a file/folder from one directory to another
(if a new path is provided)
What Happens in Git When You Rename?
When you rename file1.txt → main.js, two things happen:
file1.txtbecomes deleted in the project directory but still exists in the staging area.main.jsis treated as a new file, even if the content is the same.
Git sees renamed files as:
One file deleted
One file created
(because Git tracks content, not file names)
Add Both Files to Staging Manually
git add file1.txt main.js
But there is a better way…
Do Everything in One Command
Git provides a shortcut:
git mv file1.txt main.js
This:
Renames the file
Removes the old file
Adds the new file to staging
Does everything in one step
🗑️ Ignoring Files
To ignore files or directories:
- Create a folder:
mkdir logs
(This line continues in the next image—send the next page and I’ll complete it.)
Ignoring Files & Folders in Git
Git allows you to ignore specific files or directories so they are not tracked. This is useful for:
Log files
Build folders
Temporary files
Environment files
OS-specific junk files
Let’s walk through it step by step.
Create a directory to ignore
mkdir logs
Creates a new directory.
Create a file inside it
echo "hello" > logs/dev.log
Adds a file with some content.
Check the Git status
git status
You will see:
Untracked files:
   logs/
Git will attempt to track all files unless you explicitly tell it not to.
Tell Git to Ignore Specific Files/Folders
To ignore files or directories, create a .gitignore file.
Add “logs/” to .gitignore
echo logs/ > .gitignore
The / at the end indicates it is a directory.
Add and commit the .gitignore file
git add .gitignore
git commit -m "Add .gitignore"
Now Git knows that anything inside logs/ must be ignored.
Example .gitignore Structure
#photo-5
logs/
*.txt
*.env
If you already committed a file or folder earlier, and then you add it to .gitignore, Git WILL NOT ignore it until you remove it from tracking.
This is a common mistake.
Removing Files/Folders That Were Accidentally Committed
To check what's tracked
git ls-files
This will show files like:
bin/app.bin
If you want to remove a tracked file from both disk & Git
git rm bin/
This removes it from:
Working directory
Staging area
(Everything deleted permanently)
But we usually want to remove it only from tracking, not from disk.
To do that:
Understanding git rm Options
7️⃣ View help for rm
git rm -h
You’ll see the --cached flag:
--cached # only remove from the index (staging area)
Remove folder only from Git (not from disk)
git rm --cached bin/
Now the entire bin/ directory is removed from tracking only.
It remains physically present on your computer.
If you want to remove all its files recursively:
git rm -r --cached bin/
Whatever you do in Git — create, delete, modify — is a change.
To save the change, you must commit it.
Commit the removal
git commit -m "Remove bin/ directory that was accidentally committed"
From this point onward, Git will stop tracking changes inside the bin/ folder because:
You removed it from tracking
You added it to
.gitignore
Bonus: GitHub’s .gitignore Templates
GitHub provides ready-made .gitignore templates for all languages & frameworks.
Visit:
github-language-specific-templates
Useful templates include:
Node.js
Python
Java
React
Go
Android
macOS / Linux / Windows system files
Short Status in Git
Checking the status of your files
git status # Shows the status of tracked and untracked files
To make the output cleaner and more compact, use:
git status -s # Short status view
Short status symbols:
M  file.js    # Modified
A  file.js    # Added
?? file.js    # Untracked
Viewing Staged and Unstaged Changes
git status only shows which files are modified.
To see what has changed inside those files, you must use git diff.
View changes that are staged (ready to commit)
git diff --staged # Shows differences between staged files and the last commit
It displays every single line that will go into the upcoming commit.
Example output:
diff --git a/file1.js b/file1.js
index 1bd0b0d..47c8321 100644
--- a/file1.js
+++ b/file1.js
@@ -1,3 +1,5 @@
 hello
 world
 test
+sky
+ocean
View unstaged changes (working directory vs staging area)
git diff # Shows what is in your working directory vs what is staged
This compares:
Working directory
Staging area
Visual Diff Tools
You can also use external tools to compare changes visually:
KDiff3
P4Merge
WinMerge (Windows only)
Configuring a Visual Diff Tool
Set a diff tool globally
git config --global diff.tool vscode # Assign a tool name "vscode"
This does not automatically set VS Code as the actual diff tool yet.
You must specify how VS Code should behave.
Configure how the diff tool runs
git config --global difftool.vscode.cmd "code --wait --diff $LOCAL $REMOTE"
# Tells Git to launch VS Code for diffing local and remote versions
Editing Global Git Configurations
git config --global -e    # Open global config file in default editor
                            # (usually VS Code)
This lets you edit your global Git settings.
Example:
git config --global user.name "Muzammil Shaik" # Set your global Git username
When you open .gitconfig, you will see something like this:
[user]
    name = Mosh Hamedani
    email = pro.me@gmail.com

[core]
    autocrlf = input
    editor = code --wait
This looks similar to JSON key-value structure.
Just an observation—Git config format is its own style.
Comparing Working Directory vs Staging Area
Using diff tool for working directory
git difftool # Shows difference between working directory and staging area
7. Using diff tool for staged content
git difftool --staged # Shows staged changes compared to the last commit
Example output:
- hello
  world
  test
  sky

+ hello
  world
  test
  sky
Note:
Today, most modern code editors (VS Code, JetBrains IDEs, etc.)
automatically show diffs inline.
You do not need to explicitly run difftool unless you want to.
Viewing Commit History in Git
View full commit history
git log # Shows complete commit history from latest to oldest
This displays details such as:
Commit hash
Author
Email
Date
Commit message
Example:
commit e7e8c3d1ab...
Author: Your Name <email@gmail.com>
Date: Tue Aug 4 16:56:10 2020 -0700

    Remove the bin directory
View commit history in one line per commit
git log --oneline # Shows short commit ID + message
To reverse the order:
git log --oneline --reverse # Oldest → Latest
Viewing a Specific Commit
Show a commit using its ID
git show d601690 # Shows diff and details of this specific commit
Show a commit relative to HEAD
git show HEAD~1 # Shows the commit just before the latest commit
Explanation:
HEAD→ refers to the current/most recent commitHEAD~1→ one commit behindHEAD~2→ two commits behind, etc.
This command shows the diff of that commit.
Viewing Exact File Contents from a Previous Commit
Show a file from an older commit
git show HEAD~1:.gitignore # View the .gitignore file as it existed one commit ago
path → path to the file inside the repo.
Example output:
logs/
main.log
*.log
bin/
Showing the Latest Commit
Show the commit HEAD points to
git show HEAD # Shows the latest commit and its diff
If you want to see ALL files and folders changed in the commit instead of diff, use the tree.
Viewing File and Folder Structure of a Commit
Use Git’s internal tree structure
Git stores your filesystem in a tree data structure.
To list files and folders inside a commit:
git ls-tree HEAD~1 # Shows files/folders modified one commit before HEAD
Example output structure:
100644 blob a7d8c...    file.txt
040000 tree b921f...    src
Explanation:
blob → represents a file
tree → represents a directory
Git stores everything as objects (commits, blobs, trees, tags)
Unstaging Files
Unstage a file (move from staged → unstaged)
git restore --staged file1.js # Unstages file1.js
This keeps the file in your working directory but removes it from the staging area.
Discarding Local Changes
Undo all local changes in tracked files
git restore . # Undo all local changes in working directory
If some files still remain, it means:
They are untracked
Git has no previous version of those files
Remove untracked files/folders
git clean -fd # -f = force, -d = remove directories
Be careful — untracked files will be permanently deleted.
Restoring a File to an Earlier Version
If you accidentally deleted or modified a file, you can restore it from the previous commit.
Restore a file from an older commit
git restore --source=HEAD~1 file1.js
# Restores file1.js to how it looked one commit ago
Hidden Files/Folders in Git
Any filename that begins with a dot (.) represents a hidden file or folder.
Examples:
.gitignore.git/.env
Resetting to a Specific Commit
To go to a specific snapshot, copy the hash of the commit.
Reset to a specific commit (undo commits)
git reset <commit-hash>    # Move HEAD and branch pointer to this commit
                            # (soft by default)
Soft reset explanation:
Keeps your working directory untouched
Moves HEAD pointer
Useful for modifying or redoing commits
Git Stash (Temporary Shelving for Work)
Stash is used when you want to switch branches but have unfinished work.
Save changes temporarily
git stash # Save staged + unstaged changes
See all stashes
git stash list # Show list of saved stashes
Apply last stash (keep it in stash list)
git stash apply
Apply and remove stash
git stash pop
Reset vs Revert
Reset (rewrites history)
git reset --soft <commit>             # Move HEAD, keep all changes staged
git reset --mixed <commit>            # Move HEAD, unstage changes (default)
git reset --hard <commit>             # Move HEAD, delete all changes
Reset rewrites commit history.
Use with caution.
Revert (safe undo)
git revert <commit>                   # Creates a new commit that undoes an
                                    # old commit
Revert is safe for team collaboration because it does not rewrite history.
So that it about the git. I know it’s a long blog. Please use it as resource when you want quick reference or knowledge base.
In the next blog we will discuss about how we use git in open-source contributions.